12. Seal-In Circuits Explained ( 12 of 35 )
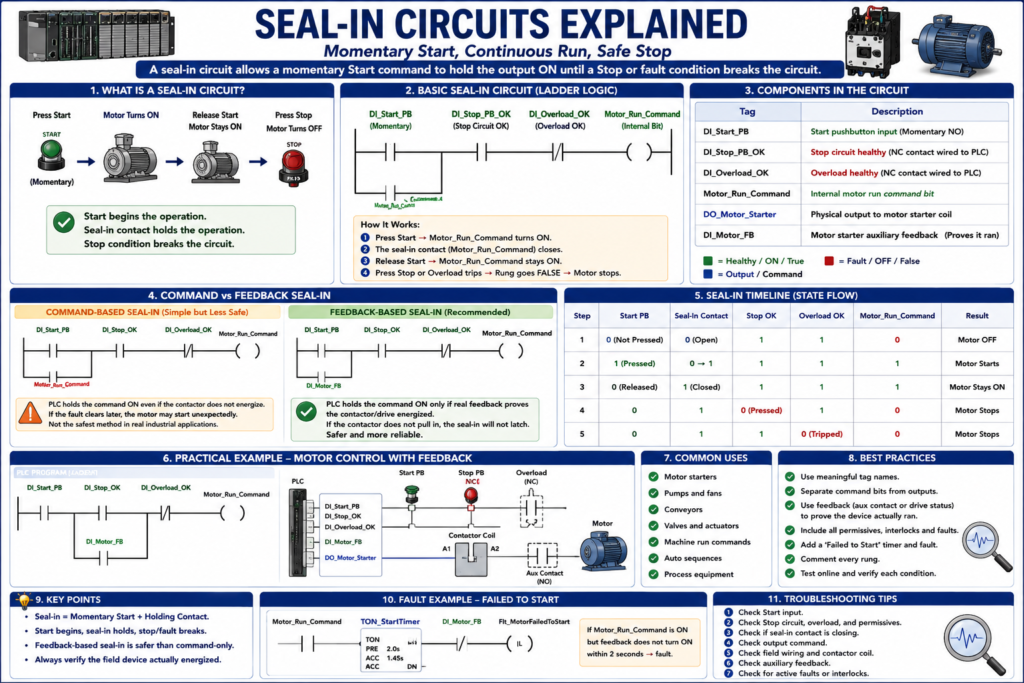
Seal-In Circuits Explained
A seal-in circuit is one of the most important basic patterns in PLC ladder logic and relay logic.
It is commonly used when an operator presses a momentary Start pushbutton, but the machine or motor needs to continue running after the button is released.
In simple words:
A seal-in circuit allows a momentary command to hold itself ON until a stop condition breaks the circuit.Typical example:
Press Start  → Motor turns ON
Release Start → Motor stays ON
Press Stop → Motor turns OFF
Seal-in logic is very common in:
Motor starters
Conveyors
Pumps
Fans
Blowers
Machine cycle start logic
Run commands
Control relays
The PLC training material explains this same idea using relay logic: after the pushbutton is released, the control relay remains energized because a seal-in contact provides another current path.
Why Seal-In Circuits Are Needed
Most Start pushbuttons are momentary.
That means:
Pressed = ON
Released = OFF
If you connect a motor command directly to a momentary Start button, the motor would only run while the button is being held.
Example:
Start button pressed → Motor ON
Start button released → Motor OFF
That is not what we usually want.
For most motor control circuits, we want this:
Start button pressed once → Motor starts
Motor keeps running
Stop button pressed → Motor stops
That is the purpose of the seal-in circuit.
Basic Seal-In Concept
The basic seal-in circuit uses two paths:
1. Start pushbutton path
2. Seal-in holding path
The Start pushbutton starts the output.
The seal-in contact keeps the output energized after Start is released.
In PLC ladder logic, the seal-in contact is usually a contact from the same command bit or from a real feedback bit.
Basic Ladder Logic Example
Tags
| Tag | Meaning |
|---|---|
DI_Start_PB | Start pushbutton input |
DI_Stop_PB_OK | Stop circuit healthy |
DI_Overload_OK | Motor overload healthy |
Motor_Run_Command | Internal motor run command |
Logic Concept
Start_PB OR Motor_Run_Command
AND Stop_OK
AND Overload_OK
THEN Motor_Run_Command
Ladder Concept
DI_Start_PB
----] [----------------+----] [----] [----( Motor_Run_Command )
                       |   DI_Stop_OK DI_Overload_OK
Motor_Run_Command      |
----] [----------------+
This creates the holding path.
How It Works Step by Step
Step 1 — Motor Stopped
Before Start is pressed:
DI_Start_PB = 0
Motor_Run_Command = 0
DI_Stop_PB_OK = 1
DI_Overload_OK = 1
The rung is false because Start is not pressed and the seal-in bit is not ON.
Result:
Motor_Run_Command = 0Step 2 — Operator Presses Start
When the operator presses Start:
DI_Start_PB = 1
DI_Stop_PB_OK = 1
DI_Overload_OK = 1
The rung becomes true.
Result:
Motor_Run_Command = 1Step 3 — Seal-In Contact Turns ON
Now that Motor_Run_Command is ON, the branch contact using Motor_Run_Command also becomes true.
So when the operator releases Start:
DI_Start_PB = 0
Motor_Run_Command = 1
The seal-in branch keeps the rung true.
Result:
Motor_Run_Command stays ONStep 4 — Operator Presses Stop
When Stop is pressed, the healthy Stop bit turns OFF:
DI_Stop_PB_OK = 0The rung becomes false.
Result:
Motor_Run_Command = 0Once the command turns OFF, the seal-in branch also turns OFF.
Seal-In Circuit in Plain English
A basic seal-in rung says:
Run the motor if Start is pressed OR the motor is already commanded to run,
as long as Stop is OK and Overload is OK.
This is the key idea.
(Start OR Already Running) AND Safety/Stop Conditions OK = Run CommandSeal-In Contact vs Start Pushbutton
The Start pushbutton is only needed to begin the operation.
The seal-in contact keeps the operation active.
| Part | Function |
|---|---|
| Start Pushbutton | Momentary command to start |
| Seal-In Contact | Maintains the command after Start is released |
| Stop Contact | Breaks the seal-in circuit |
| Overload Contact | Drops the command if motor protection trips |
| Output Coil | Motor run command or starter command |
Electrical Relay Seal-In vs PLC Seal-In
Seal-in circuits existed before PLCs.
In a traditional relay control circuit, the auxiliary contact of a relay or contactor is wired in parallel with the Start pushbutton.
In a PLC, the seal-in contact is usually a virtual contact reading a PLC memory bit.
Relay Seal-In
Physical auxiliary contact holds the coil energized.PLC Seal-In
PLC memory bit or feedback input holds the command true.Both perform the same logical function, but they are implemented differently.
Important: Command Seal-In vs Feedback Seal-In
This is where the topic becomes very important for real industrial troubleshooting.
There are two common methods:
Command-based seal-in
Feedback-based seal-in
1. Command-Based Seal-In
A command-based seal-in uses the same output command bit to hold itself ON.
Example:
Motor_Run_Command seals in Motor_Run_CommandThis is simple and common in training examples.
Problem
The PLC may command the motor to run, but the real contactor may not actually energize.
Example:
Motor_Run_Command = 1
DO_Motor_Starter = 1
But the contactor coil circuit is open
Motor does not run
The PLC “thinks” the output is ON, but the real device may not have responded.
The industrial instrumentation text warns about this type of situation: if the PLC output remains energized while the contactor did not actually energize, clearing the fault later can cause the motor to start unexpectedly.
2. Feedback-Based Seal-In
A feedback-based seal-in uses a real auxiliary contact or feedback signal to hold the command ON.
Example:
Motor_Running_Feedback seals in Motor_Run_CommandIn this method, the PLC only seals in the motor command if the real field device proves it energized.
Typical feedback sources:
Contactor auxiliary contact
Motor starter auxiliary contact
VFD running status
Relay feedback
Drive status bit
The source material shows that connecting a contactor auxiliary contact to a PLC input allows the PLC to sense the real-time contactor status and use that feedback as the seal-in contact instead of only relying on the output command bit.
Safer Industrial Seal-In Logic
A more professional motor seal-in may use feedback.
Tags
| Tag | Meaning |
|---|---|
DI_Start_PB | Start pushbutton |
DI_Stop_PB_OK | Stop circuit OK |
DI_Overload_OK | Overload OK |
DI_Motor_FB | Motor starter auxiliary feedback |
Motor_Run_Command | Internal motor run command |
DO_Motor_Starter | Physical output to starter |
Logic Concept
DI_Start_PB OR DI_Motor_FB
AND DI_Stop_PB_OK
AND DI_Overload_OK
THEN Motor_Run_Command
This means:
Start the motor when Start is pressed.
Keep it running only if real feedback proves the starter energized.
This is safer than only sealing in with the output command.
Why Feedback Seal-In Is Better
Feedback seal-in helps prevent this dangerous situation:
Operator presses Start.
PLC output turns ON.
Motor does not actually start because of a coil circuit problem.
Operator releases Start.
PLC output stays latched.
Someone clears the field problem.
Motor starts unexpectedly.
With feedback seal-in:
Operator presses Start.
PLC output turns ON.
If contactor does not actually energize, feedback stays OFF.
When Start is released, command drops out.
Motor will not start unexpectedly later.
That is a better industrial behavior.
Seal-In vs Latch/Unlatch
A seal-in circuit and latch/unlatch instructions are related, but they are not the same style.
Seal-In Using OTE
A seal-in rung usually uses an OTE coil and a holding branch.
Rung true  → command ON
Rung false → command OFF
This is usually easier to troubleshoot.
Latch/Unlatch Using OTL/OTU
A latch/unlatch circuit uses retentive instructions.
OTL = latch bit ON
OTU = unlatch bit OFF
The uploaded material explains that set/reset or latch/unlatch coils are retentive instructions: once energized, they retain the memory bit until the opposite instruction changes it.
When to Use Seal-In vs Latch/Unlatch
Use Seal-In Logic For:
Normal motor run commands
Conveyor run commands
Pump run commands
Simple maintained machine commands
Easy-to-read start/stop logic
Use Latch/Unlatch Carefully For:
Fault latches
Alarm latches
Cycle started memory
Step sequence memory
Mode selection
Events that must stay stored until reset
For beginners, seal-in logic is often easier to understand because the rung shows exactly what conditions are keeping the command ON.
Basic Seal-In With Stop and Fault
A more realistic seal-in should include fault logic.
Requirement
Motor runs when:
Start is pressed OR motor is already running
AND Stop circuit is OK
AND Overload is OK
AND No fault is active
Logic Concept
(Start_PB OR Motor_Run_Command)
AND Stop_OK
AND Overload_OK
AND NOT Fault_Active
= Motor_Run_Command
Ladder Concept
DI_Start_PB
----] [----------------+----] [----] [----]/[----( Motor_Run_Command )
                       |   Stop_OK  OL_OK  Fault_Active
Motor_Run_Command      |
----] [----------------+
This is a very common PLC pattern.
Seal-In With HMI Start
In real machines, a motor may start from:
Local Start PB
HMI Start Button
Auto Sequence Start
So the start branch may include multiple sources.
DI_Local_Start_PB
----] [----------------+
                       |
HMI_Start_Command      +---- Stop_OK ---- OL_OK ---- NOT Fault ----( Motor_Run_Command )
----] [----------------+
                       |
Auto_Start_Command     |
----] [----------------+
                       |
Motor_Run_Command      |
----] [----------------+
This means any valid start source can begin the command, and the seal-in branch keeps it active.
Seal-In With Stop Request
Some programs use a Stop request bit instead of only the physical Stop input.
Example:
Stop_Request = Physical Stop PB OR HMI Stop OR Fault StopThen the seal-in logic may use:
Start_Request OR Motor_Run_Command
AND NOT Stop_Request
AND Permissive_OK
THEN Motor_Run_Command
This is useful when multiple conditions can stop the machine.
Recommended Professional Structure
A good industrial structure separates the logic:
1. Input Mapping
2. Start/Stop Requests
3. Permissives
4. Faults
5. Run Command Seal-In
6. Output Mapping
7. Feedback Verification
Example:
DI_Start_PB → Start_Request
DI_Stop_PB_OK → Stop_OK
DI_Overload_OK → Motor_Permissive_OK
Start_Request + Seal-In → Motor_Run_Command
Motor_Run_Command → DO_Motor_Starter
DI_Motor_FB → Motor_Running_Status
Command ON but Feedback OFF after timer → Fault
This is much more professional than one huge rung.
Feedback Failure Fault
In real equipment, feedback should often be monitored.
Fault Requirement
If the PLC commands the motor to run, but feedback does not turn ON after a short time, generate a fault.
Example:
Motor_Run_Command = ON
DI_Motor_FB = OFF
Timer reaches 2 seconds
Fault_MotorFailedToStart = ON
This catches problems such as:
Bad starter coil
Blown fuse
Open wire
Bad auxiliary contact
Contactor not pulling in
VFD not responding
Overload problem
Control voltage missing
This is a very useful troubleshooting feature.
Practical Example: Conveyor Seal-In
Inputs
DI_Start_PB
DI_Stop_PB_OK
DI_EStop_OK
DI_Overload_OK
DI_Conveyor_FB
Outputs
DO_Conveyor_Starter
DO_Run_Light
DO_Fault_Light
Internal Tags
Conveyor_Start_Request
Conveyor_Permissive_OK
Conveyor_Run_Command
Conveyor_Running_Status
Flt_Conveyor_FailedToStart
Logic Flow
Start PB → Start Request
Stop OK + EStop OK + Overload OK → Permissive OK
Start Request OR Feedback → Run Command
Run Command → Starter Output
Starter Feedback → Running Status
Command without feedback → Fault
That is a realistic industrial approach.
Common Beginner Mistakes
Mistake 1 — Seal-In Without Stop Condition
Bad:
Start OR Motor_Run_Command = Motor_Run_CommandProblem:
Nothing stops the motor.Always include stop, overload, fault, and safety-related permissive conditions.
Mistake 2 — Using Output Command as Proof
Bad assumption:
DO_Motor_Starter = 1, so the motor is running.Better thinking:
DO_Motor_Starter = command.
DI_Motor_FB = proof.
Command and feedback are not the same.
Mistake 3 — Using Latch/Unlatch Everywhere
Latch/unlatch can be useful, but overusing it can make logic harder to troubleshoot.
A simple seal-in rung with OTE is often easier to read.
Mistake 4 — No Feedback Fault
If the PLC commands a device but does not verify feedback, the system may not detect that the field device failed to operate.
This can hide real problems.
Automation Technician Notes
When troubleshooting a seal-in circuit, ask:
Did the Start request turn ON?
Is the Stop circuit OK?
Are all permissives healthy?
Is any fault active?
Did the command bit turn ON?
Did the physical output turn ON?
Did the field device actually energize?
Did the feedback turn ON?
Is the seal-in branch using command or real feedback?
Is a reset required after a fault?
A seal-in problem is not always a Start button problem.
Sometimes the seal-in drops because:
Stop_OK is false
Overload_OK is false
Fault_Active is true
Feedback did not prove
Permissive dropped
Output mapping is missing
The command is overwritten later
Troubleshooting Example
Problem
Operator presses Start. Motor runs only while the Start button is held.
Possible Causes
Seal-in branch is missing
Seal-in contact/tag is wrong
Motor_Run_Command is not staying ON
Stop_OK drops out
Overload_OK drops out
Feedback seal-in is used, but feedback never turns ON
Wrong contact type: XIC/XIO issue
Output command is being reset later
Best Troubleshooting Path
1. Watch DI_Start_PB online.
2. Watch Start_Request.
3. Watch Stop_OK and Overload_OK.
4. Watch Motor_Run_Command.
5. Watch the seal-in branch contact.
6. Watch physical output DO_Motor_Starter.
7. Watch feedback DI_Motor_FB.
8. Check for fault or reset logic dropping the command.
Key Terms
| Term | Meaning |
|---|---|
| Seal-In Circuit | Logic that holds a command ON after a momentary Start |
| Holding Contact | Contact in parallel with Start that maintains the rung |
| Start Pushbutton | Momentary input used to begin operation |
| Stop Circuit | Condition that breaks the seal-in path |
| Command | PLC request to energize a device |
| Feedback | Proof from the field device that it actually responded |
| Auxiliary Contact | Contact used to prove relay/contactor status |
| OTE | Output Energize instruction |
| OTL | Output Latch instruction |
| OTU | Output Unlatch instruction |
| Retentive | Memory that stays stored until changed or reset |
| Non-Retentive | Memory that turns OFF when rung goes false |
| Failed To Start | Fault when command is ON but feedback does not prove |
Final Thoughts
A seal-in circuit is one of the most important patterns in ladder logic.
It allows a momentary Start command to become a maintained Run command until a Stop, overload, fault, or permissive condition breaks the circuit.
For training, a command-based seal-in is easy to understand. But in real industrial machines, a feedback-based seal-in or feedback verification is often better because it confirms the field device actually responded.
The key lesson is:
Command tells the machine what to do.
Feedback proves that it actually happened.
When you understand seal-in circuits, motor control, conveyor control, pump logic, and start/stop troubleshooting become much easier.