7. Motor Starter Troubleshooting Basics (7 of 13)
How to Diagnose Contactors, Overloads, Coils, and Control Circuits
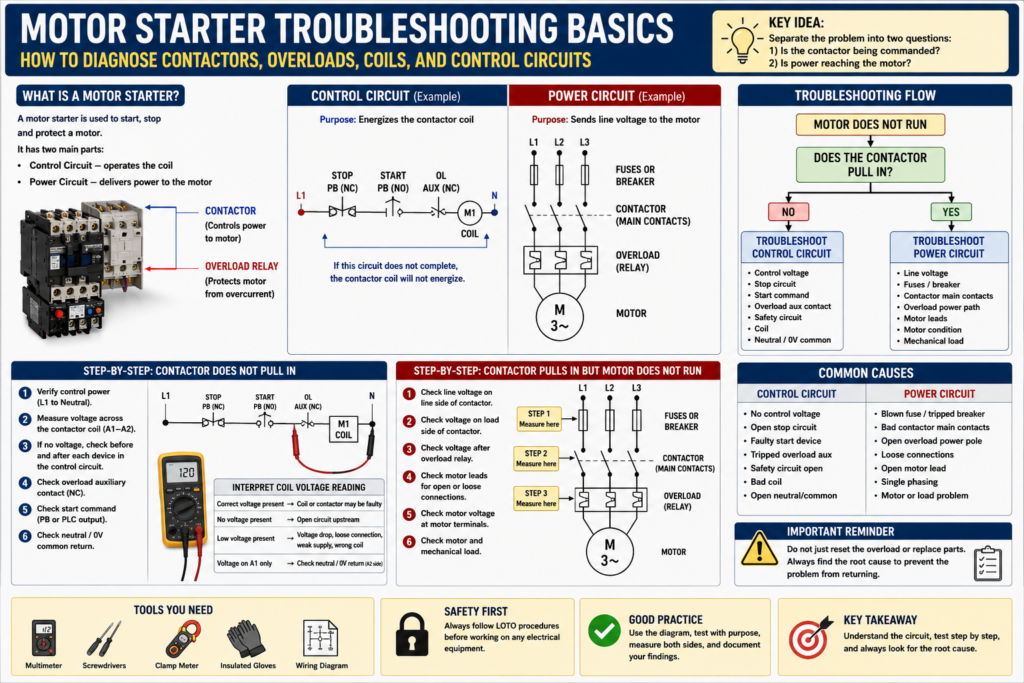
Motor starters are one of the most common devices found inside industrial electrical control panels. They are used to start and stop motors safely by combining a contactor with overload protection.
When a motor does not start, many people immediately think:
“The motor is bad.”But in real troubleshooting, the motor is only one possible cause.
The problem could be in the control circuit, the contactor coil, the overload contact, the power circuit, the motor wiring, the disconnect, the fuses, the PLC command, or even the mechanical load connected to the motor.
A good technician does not guess.
A good technician separates the system into sections and proves where the failure is located.
Motor control troubleshooting follows the same systematic approach used in basic control circuits: use the work order, use the meter, use the circuit diagram, start from the point of failure, and backtrack toward the source.
1. What Is a Motor Starter?
A motor starter is an electrical control device used to start, stop, and protect an electric motor.
A basic magnetic motor starter usually includes:
Contactor
Overload relay
Contactor coil
Auxiliary contacts
Power contacts
Control terminals
Line terminals
Load terminals
The starter has two main sections:
| Section | Purpose |
|---|---|
| Control Circuit | Energizes or de-energizes the starter coil |
| Power Circuit | Sends line voltage to the motor through the contactor contacts |
This distinction is very important.
The control circuit decides when the motor should run.
The power circuit delivers voltage and current to the motor.
2. Control Circuit vs Power Circuit
A motor starter can fail from either side.
Control Circuit
The control circuit may include:
Stop pushbutton
Start pushbutton
PLC output
Relay contact
Overload auxiliary contact
Safety relay contact
Contactor coil
Neutral or 0V common
Example:
L1 → Stop PB NC → Start PB NO → Overload NC → M1 Coil → NeutralIf this circuit does not complete, the contactor coil will not energize.
Power Circuit
The power circuit may include:
Main disconnect
Breaker or fuses
Contactor main contacts
Overload current path
Motor leads
Motor windings
Example:
L1/L2/L3 → Fuses → Contactor Contacts → Overload → MotorIf the control circuit works but the power circuit has a problem, the contactor may pull in but the motor may still not run correctly.
3. Common Motor Starter Symptoms
A motor starter problem can show up in different ways.
| Symptom | Possible Direction |
|---|---|
| Contactor does not pull in | Check control circuit and coil voltage |
| Contactor pulls in but motor does not run | Check power circuit and motor leads |
| Motor starts then trips overload | Check motor load, current, overload setting |
| Contactor chatters | Check low voltage, loose wiring, weak coil, unstable command |
| Motor hums but does not rotate | Check phase loss, mechanical jam, motor issue |
| Overload trips repeatedly | Check current, load, phase imbalance, overload sizing |
| Fuse blows when motor starts | Check short circuit, motor wiring, contactor, motor |
The manual mentions several issues that can contribute to motor failure or starter-related problems, including bearing failures, severe phase imbalance, voltage surges, improper overload calibration, defective insulation, rapid loading/unloading, and overvoltage.
4. Start with the Symptom
Before opening the panel, understand what is actually happening.
Ask the operator:
Did the motor fail to start?
Did it stop during operation?
Did it trip immediately?
Did it run for a few seconds and stop?
Was there a burning smell?
Did the overload trip?
Did the breaker trip?
Did the HMI show an alarm?
Was the motor overloaded mechanically?
Was maintenance recently performed?
A symptom gives you direction.
For example:
Motor does not start at all.This points first toward the control circuit or starter coil.
Contactor pulls in, but motor does not run.This points more toward the power circuit, overload path, motor leads, or motor.
Motor runs but overload trips after a few minutes.This points toward current, load, overload setting, phase imbalance, ventilation, or mechanical binding.
5. Check if the Contactor Pulls In
The first major question is:
Does the contactor energize when the motor is commanded to run?If the contactor does not pull in
Focus on the control circuit:
Control voltage
Stop circuit
Start command
PLC output
Safety circuit
Overload auxiliary contact
Contactor coil
Neutral/common return
If the contactor pulls in
Focus on the power circuit:
Line voltage
Fuses
Main contacts
Overload power path
Motor leads
Motor terminals
Motor condition
Mechanical load
This single observation splits the troubleshooting path.
6. Troubleshooting When the Contactor Does Not Pull In
Basic control circuit:
L1 → Stop PB NC → Start PB NO → OL NC → M1 Coil → NeutralStep-by-step:
Step 1 — Verify control voltage
Measure control voltage source.
Example:
L1 to Neutral = 120 VACor:
+24VDC to 0VDC = 24 VDCIf control voltage is missing, troubleshoot the source, fuse, transformer, or power supply.
Step 2 — Measure across the contactor coil
Measure directly across the coil terminals.
Common terminal names:
A1 and A2Expected result:
Rated coil voltage when the motor is commanded to startExample:
120 VAC coil → expect 120 VAC across A1 and A2
24 VDC coil → expect 24 VDC across A1 and A2
Interpretation:
| Reading Across Coil | Meaning |
|---|---|
| Correct voltage present | Coil or contactor may be defective |
| No voltage present | Control circuit is open upstream |
| Low voltage present | Voltage drop, weak supply, loose connection, wrong coil |
| Voltage on A1 only | Check A2 neutral/common return |
Step 3 — Backtrack through the control circuit
If the coil does not receive voltage, move backward:
M1 Coil → Overload NC Contact → Start Command → Stop Circuit → Fuse → Control SourceCheck:
Is the overload tripped?
Is the stop circuit closed?
Is the start command closing?
Is the PLC output energized?
Is the safety relay allowing the circuit?
Is the control fuse good?
Is neutral/common present?
7. Troubleshooting the Overload Auxiliary Contact
The overload relay usually has an auxiliary contact wired in series with the contactor coil.
This contact is often normally closed.
Example:
L1 → Stop PB → Start PB → OL NC → M1 Coil → NeutralWhen the overload trips, the NC contact opens and removes power from the coil.
Check:
Is the overload tripped?
Has it been reset?
Is the overload contact closed?
Is voltage present before the overload contact?
Is voltage present after the overload contact?
Important:
Do not just reset the overload and walk away.
Ask:
Why did the overload trip?Possible causes:
Motor overloaded
Mechanical jam
Bearing issue
Low voltage
Phase imbalance
Incorrect overload setting
Motor insulation problem
Frequent starting
Poor ventilation
Wrong motor size
The manual emphasizes that even when the immediate problem is corrected, the technician must continue looking for the root cause because the fault may return if the true cause is not corrected.
8. Troubleshooting When the Contactor Pulls In but the Motor Does Not Run
If the contactor pulls in, the control circuit is probably working.
Now check the power circuit.
Basic power path:
L1/L2/L3 → Breaker/Fuses → Contactor Contacts → Overload → Motor Leads → MotorStep-by-step:
Step 1 — Verify line voltage into the starter
Measure line-to-line voltage at the line side of the contactor.
For a three-phase motor:
L1-L2
L2-L3
L1-L3
Expected:
Correct plant voltage, such as 208 VAC, 240 VAC, or 480 VACStep 2 — Verify voltage leaving the contactor
With the contactor energized, measure the load side:
T1-T2
T2-T3
T1-T3
If voltage is present on the line side but missing on the load side, possible causes include:
Bad contactor main contacts
Contactor not fully closing
Burned contacts
Mechanical contactor issue
Loose terminal
Step 3 — Check voltage after the overload
If voltage leaves the contactor, check after the overload relay.
Possible problems:
Open overload power pole
Loose overload connection
Burned terminal
Incorrect wiring
Mechanical damage
Step 4 — Check motor leads and motor terminals
If voltage is present at the starter but not at the motor, suspect:
Open motor lead
Loose terminal
Damaged cable
Bad junction box connection
Wrong wiring
Disconnect near motor open
9. Motor Runs but Trips the Overload
If the motor starts and then trips the overload, do not assume the overload is bad.
The overload may be doing its job.
Check:
Motor current on each phase
Overload setting
Motor nameplate FLA
Mechanical load
Bearing condition
Gearbox condition
Conveyor jam
Pump blockage
Fan obstruction
Voltage balance
Phase imbalance
Motor ventilation
Start/stop frequency
A motor overload trip is often caused by excessive current.
Possible reasons:
Mechanical overload
Single phasing
Low voltage
Phase imbalance
Incorrect overload setting
Motor insulation issue
Bad bearings
Locked rotor condition
Frequent starts
Wrong motor application
The manual states that properly installed and maintained motor starters are intended to protect motors from burnout, but there are still limitations and external conditions that can lead to failure.
10. Contactor Chattering
Contactor chattering means the contactor rapidly pulls in and drops out.
Common causes:
Low control voltage
Loose control wire
Bad seal-in contact
Weak coil
Wrong coil voltage
PLC output cycling
Unstable safety circuit
Bad auxiliary contact
Voltage drop during motor start
Mechanical obstruction in contactor
Troubleshooting steps:
Measure coil voltage while the contactor is chattering.
Check control transformer output.
Check for loose terminals.
Check the seal-in auxiliary contact.
Check PLC command stability.
Check safety relay status.
Check coil rating.
If voltage to the coil is dropping out, the problem is likely upstream.
If voltage remains stable but the contactor chatters, suspect the coil or mechanical contactor assembly.
11. Motor Starter Troubleshooting Flow
Use this simple flow:
Motor does not run
      ↓
Does contactor pull in?
      ↓
NO → Troubleshoot control circuit
      ↓
YES → Troubleshoot power circuit
      ↓
Does motor receive correct voltage?
      ↓
NO → Check fuses, contacts, overload, wiring
      ↓
YES → Check motor, load, overload, mechanical condition
This helps avoid jumping to conclusions.
12. Common Motor Starter Faults and Checks
| Problem | What to Check First |
|---|---|
| Coil does not energize | Control voltage at A1/A2 |
| Coil has voltage but no pull-in | Coil rating, coil condition, mechanical issue |
| Overload tripped | Motor current, load, overload setting |
| Contactor pulls in but motor dead | Power circuit voltage at T1/T2/T3 |
| One phase missing | Fuses, contactor contacts, overload, wiring |
| Contactor chatters | Coil voltage stability |
| Fuse blows | Short circuit, motor leads, motor windings |
| Motor hums | Phase loss, mechanical jam, motor issue |
| Starter overheats | Loose terminals, overload, excessive current |
13. Practical Example: Contactor Does Not Pull In
Symptom:
Motor M1 does not start.
Other machines in the panel operate normally.
M1 contactor does not pull in.
Expected operation:
When Start is pressed, 120 VAC should energize M1 coil through the stop circuit and overload contact.Testing:
Measured 120 VAC control power available.
Measured 0 VAC across M1 coil when Start was pressed.
Measured 120 VAC before overload auxiliary contact.
Measured 0 VAC after overload auxiliary contact.
Found overload tripped.
Finding:
Overload auxiliary contact was open because the overload was tripped.Correction:
Reset overload after inspection.
Checked motor current during test run.
Root cause:
Motor current was above nameplate FLA due to a partially jammed conveyor roller.Final verification:
Removed mechanical jam.
Motor current returned to normal.
Motor started and ran correctly.
This is proper troubleshooting because it did not stop at “reset the overload.” It found why the overload tripped.
14. Practical Example: Contactor Pulls In but Motor Does Not Run
Symptom:
Motor M2 does not run.
M2 contactor pulls in normally.
Expected operation:
When the contactor energizes, three-phase voltage should pass through the contactor and overload to the motor.Testing:
Measured 480 VAC on line side of contactor.
Measured 480 VAC on load side between T1-T2.
Measured 0 VAC between T2-T3.
Measured 480 VAC between T1-T3.
Inspected contactor and found one burned main contact.
Finding:
One phase was not passing through the contactor.Correction:
Replaced contactor after LOTO.Root cause:
Loose terminal caused heating and contact damage.Final verification:
Verified balanced three-phase voltage on load side.
Checked motor current on all phases.
Motor ran normally.
15. Technician Checklist
[ ] Confirm the symptom.
[ ] Determine if the contactor pulls in.
[ ] Verify control voltage.
[ ] Measure voltage across the coil.
[ ] Check stop circuit, start command, safety circuit, and overload contact.
[ ] Verify neutral/common return.
[ ] If contactor pulls in, check line side voltage.
[ ] Check load side voltage.
[ ] Check overload output voltage.
[ ] Check motor leads and terminals.
[ ] Check motor current on each phase.
[ ] Compare overload setting to motor nameplate FLA.
[ ] Inspect for mechanical load problems.
[ ] Repair safely using LOTO when required.
[ ] Verify operation.
[ ] Identify root cause.
[ ] Document findings.
16. Final Thoughts
Motor starter troubleshooting becomes much easier when the technician separates the problem into two questions:
Is the contactor being commanded?
Is power reaching the motor?
If the contactor does not pull in, troubleshoot the control circuit.
If the contactor pulls in but the motor does not run, troubleshoot the power circuit.
If the motor runs but trips overload, troubleshoot the motor current and mechanical load.
Do not guess.
Do not only reset the overload.
Do not replace the motor without testing.
Do not ignore loose terminals, voltage imbalance, or mechanical binding.
A motor starter is simple when you break it down:
Command → Coil → Contacts → Overload → Motor → LoadFollow the path, measure with purpose, and always look for the root cause.