25. Timers, Counters, and One-Shots in PLC Logic
Timers, counters, and one-shots are some of the most important instructions in PLC programming.
They are used in almost every industrial machine.
A PLC program does not only turn outputs ON and OFF. It must also handle timing, counting, delays, pulses, confirmation, and sequence control.
Examples:
Delay a conveyor start
Debounce a noisy sensor
Confirm motor feedback
Count bottles or boxes
Trigger an event only once
Delay an alarm
Stop a process after a timeout
Create a controlled machine sequence
For an automation technician, understanding these instructions is critical because many troubleshooting problems are related to timing, counts, or one-scan pulses.
1. Why Timers, Counters, and One-Shots Matter
Industrial machines depend on timing and events.
A sensor may need to be ON for 100 ms before the PLC accepts it.
A motor may need 3 seconds to prove feedback.
A cylinder may need 2 seconds to extend.
A conveyor may need to run for 5 seconds after a photoeye clears.
A counter may need to count one product per detection.
Without timers, counters, and one-shots, logic becomes unreliable.
Common uses:
Sensor debounce
Motor feedback fault delay
Valve open timeout
Cylinder extend timeout
Product counting
Batch counting
Cycle counting
Reject counting
Alarm delay
Sequence timing
Auto close delay
These instructions help the PLC make decisions based on time and events.
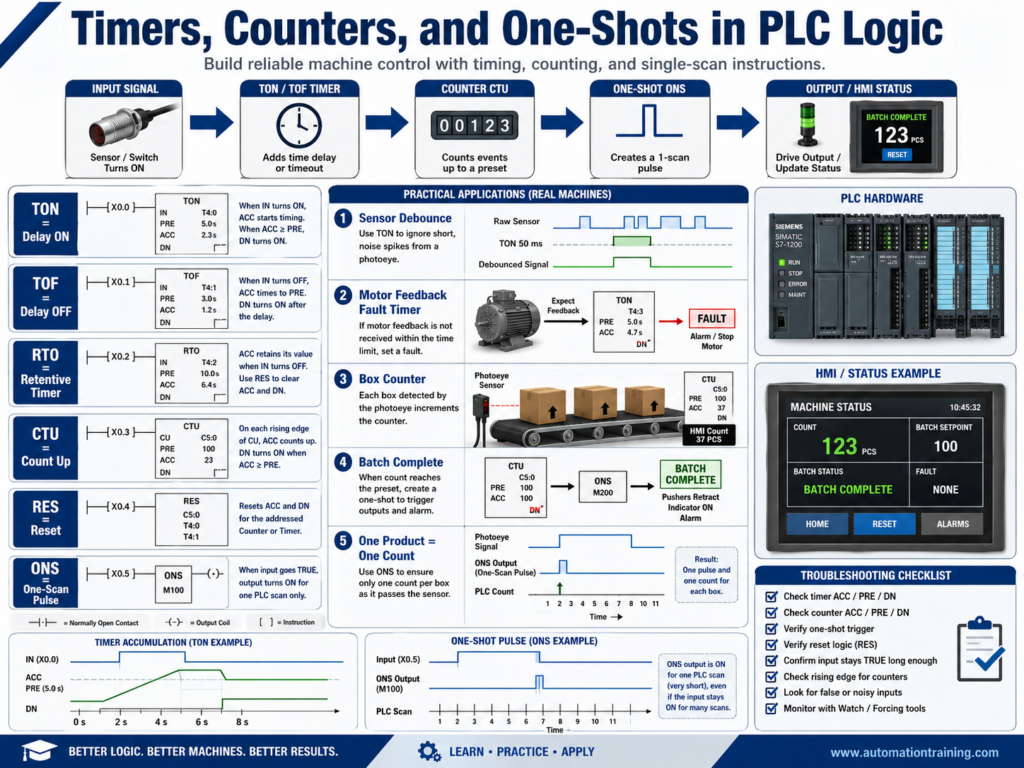
2. TON — Timer On Delay
A TON, or Timer On Delay, starts timing when the rung condition becomes true.
The timer accumulates time while the rung stays true.
When the accumulated time reaches the preset time, the timer done bit turns ON.
Simple concept:
Condition becomes TRUE
        ↓
Timer starts timing
        ↓
Preset time reached
        ↓
Timer Done bit turns ON
Example:
Photoeye blocked for 2 seconds
= Jam condition confirmed
A TON is useful when you want to confirm that a condition has stayed true long enough.
3. TON Important Bits
A typical Allen-Bradley TON has important elements:
.PRE = Preset time
.ACC = Accumulated time
.EN  = Enable bit
.TT  = Timer Timing bit
.DN  = Done bit
PRE — Preset
The target time.
Example:
PRE = 3000 msThis means the timer is set for 3 seconds if the time base is milliseconds.
ACC — Accumulated
The current accumulated time.
Example:
ACC = 1500 msThe timer has accumulated 1.5 seconds.
DN — Done Bit
The done bit turns ON when:
ACC >= PREThe .DN bit is commonly used to trigger the next action.
4. TON Example: Motor Feedback Fault
A motor feedback fault should not happen instantly.
The motor starter or VFD may need a short time to respond.
Example logic:
Motor_Run_Command = ON
AND Motor_Running_Feedback = OFF
Start 3-second timer
If the timer reaches 3 seconds:
Motor_Feedback_Fault = ONMeaning:
The PLC commanded the motor to run, but feedback did not return in time.Possible causes:
Contactor did not pull in
VFD did not run
Overload tripped
Broken feedback wire
Bad auxiliary contact
Bad PLC input
No control voltage
This is one of the most common professional uses of a TON timer.
5. TON Example: Sensor Debounce
A noisy sensor may flicker ON and OFF.
Without debounce, the PLC may react to false transitions.
A TON can confirm the sensor is truly ON.
Example:
Raw_Photoeye_Input ON for 100 ms
= Valid_Photoeye_Input ON
This prevents vibration, noise, or brief interruptions from creating false logic events.
Debounce is especially useful for:
Photoeyes
Proximity sensors
Limit switches
Push buttons
Pressure switches
Mechanical contacts
6. TOF — Timer Off Delay
A TOF, or Timer Off Delay, delays turning something OFF.
The done bit remains ON for the preset time after the rung condition goes false.
Simple concept:
Condition TRUE
        ↓
Output allowed
        ↓
Condition goes FALSE
        ↓
Timer keeps output ON for preset time
        ↓
Timer expires
        ↓
Output turns OFF
Common uses:
Fan post-run
Conveyor run-out delay
Keep signal ON briefly
Delay output off
Prevent short cycling
Post-purge timing
Example:
Fan_Run_Command turns OFF
Fan continues running for 10 seconds
TOF is useful when equipment should remain active briefly after the command is removed.
7. RTO — Retentive Timer
An RTO, or Retentive Timer On, keeps its accumulated value when the rung goes false.
A normal TON resets when the rung goes false.
An RTO does not reset automatically.
Simple difference:
TON resets when rung goes false.
RTO keeps accumulated time until reset.
Common uses:
Track total runtime
Maintenance timers
Accumulated operating hours
Process time accumulation
Example:
Motor running time accumulates
Maintenance alarm after 500 hours
An RTO usually needs a reset instruction to clear the accumulated time.
8. CTU — Count Up
A CTU, or Count Up instruction, counts events.
Common uses:
Count bottles
Count boxes
Count cycles
Count rejects
Count motor starts
Count completed batches
A counter has important values:
.PRE = Preset count
.ACC = Accumulated count
.DN  = Done bit
Example:
Count 100 bottles
When count reaches 100
Turn ON Batch_Complete
The counter done bit turns ON when:
ACC >= PRE9. CTU Example: Product Counting
A photoeye detects products on a conveyor.
Each product should increase the count by one.
Example:
Box_Detected
        ↓
One-shot pulse
        ↓
CTU Box_Count
If the preset is 50:
Box_Count.ACC = 50
Box_Count.DN = ON
The PLC can then trigger:
Batch complete
Case full
Stop conveyor
Start next sequence
10. Why Counters Need One-Shots
This is very important.
A PLC scans many times per second.
If a photoeye stays ON while a box passes, the input may be true for many scans.
Without a one-shot, the counter may count multiple times for one box.
Example problem:
One box blocks photoeye for 0.5 seconds
PLC scans many times during that period
Counter increments many times
Solution:
Use a one-shot so the counter counts only once when the sensor transitions ON.11. ONS — One-Shot
A one-shot creates a pulse for one PLC scan when a condition changes from false to true.
In Allen-Bradley, this may be called:
ONS
OSR
One-Shot Rising
Simple concept:
Input goes from OFF to ON
        ↓
One-shot turns ON for one scan
        ↓
Then turns OFF even if input remains ON
Common uses:
Count one product
Trigger one event
Capture one value
Start one sequence transition
Toggle a bit
Log one fault occurrence
A one-shot is not used to hold something ON.
It is used to create a single pulse.
12. One-Shot Example: Count One Box
Without one-shot:
Photoeye ON = counter counts every scanWith one-shot:
Photoeye changes from OFF to ON
= one pulse
= counter counts once
This is why one-shots are essential in counting logic.
13. One-Shot Example: Sequence Transition
In a state machine, you may want to move from one state to another only once.
Example:
Door_State = 10 Opening
AND Open_Limit_Switch = ON
ONS
MOV 20 Door_State
The one-shot can help prevent repeated execution or repeated actions when a condition stays true.
This is useful for:
State transitions
Value capture
Recipe loading
Event logging
Counter increments
Batch step advancement
14. RES — Reset Instruction
The RES instruction resets timers and counters.
Common uses:
Reset counter ACC value
Reset timer ACC value
Clear batch count
Clear runtime timer
Reset reject count
Example:
Reset_Count_PB
RES Box_Counter
Important:
Use reset carefully.
For production counters, maintenance counters, and batch counters, resetting the wrong value can cause reporting or process problems.
15. Timer Troubleshooting
When a timer does not work correctly, check:
Is the rung condition true?
Is the timer enabled?
Is ACC increasing?
Is PRE correct?
Does DN turn ON?
Does the rung reset before timing completes?
Is the input flickering?
Is the timer being reset elsewhere?
Is the routine being scanned?
A common issue:
Timer ACC starts increasing, then resets repeatedly.Possible causes:
Noisy input
Loose wire
Interlock flickering
Wrong XIC/XIO
Condition not staying true
Routine not scanned consistently
16. Counter Troubleshooting
When a counter does not count correctly, check:
Is the input changing state?
Is a one-shot used?
Is the counter reset active?
Is the preset correct?
Is ACC increasing?
Is DN turning ON?
Is the sensor staying ON too long?
Is the counter counting too many times?
Is the logic using the correct counter bit?
If a counter counts too many products, suspect missing one-shot logic or sensor bounce.
If a counter does not count, check the signal path and one-shot condition.
17. One-Shot Troubleshooting
When a one-shot does not behave as expected, check:
Is the input transitioning from false to true?
Is the storage bit used only once?
Is the one-shot placed correctly?
Is the condition already true before the scan?
Is the rung being scanned?
Is the one-shot being triggered by a noisy signal?
Important:
Each one-shot needs its own storage bit.
Reusing the same storage bit in multiple places can create confusing behavior.
18. Common Mistakes New Technicians Make
Mistake 1 — Counting without a one-shot
This causes multiple counts from one product.
Mistake 2 — Using a TON when a TOF is needed
A TON delays turning ON.
A TOF delays turning OFF.
Mistake 3 — Forgetting that TON resets when rung goes false
If the rung condition flickers, the timer may never finish.
Mistake 4 — Resetting counters accidentally
A reset rung may be true when the technician does not expect it.
Mistake 5 — Using the same one-shot storage bit multiple times
Each one-shot should have a unique storage bit.
Mistake 6 — Using timers to hide real problems
Do not use excessive delays to cover up bad sensors, noise, or mechanical issues.
19. Best Practices
Use these best practices:
Use TON for ON-delay confirmation.
Use TOF for OFF-delay behavior.
Use RTO for accumulated runtime.
Use CTU with one-shots for counting events.
Use unique storage bits for each one-shot.
Use clear timer and counter names.
Use comments to explain timing purpose.
Use reasonable preset values.
Use debounce for noisy inputs.
Use timeout timers for motion faults.
Use reset conditions carefully.
Show important timer/counter values on HMI when useful.
Example tag names:
TMR_Motor_Feedback
TMR_Photoeye_Debounce
TMR_Cylinder_Extend_Timeout
CTR_Box_Count
CTR_Reject_Count
ONS_Box_Detected
Good names make troubleshooting easier.
20. Technician Checklist
When reviewing timers, counters, and one-shots, ask:
What condition starts the timer?
What condition resets the timer?
What does the timer done bit trigger?
Is the preset value reasonable?
Is this an ON delay or OFF delay?
Should the timer be retentive?
What event increments the counter?
Is a one-shot needed?
What resets the counter?
Is the one-shot storage bit unique?
Is the routine being scanned?
Are timer/counter values shown on the HMI if needed?
Final Thoughts
Timers, counters, and one-shots are basic instructions, but they are used in very powerful ways.
They help the PLC manage time, events, product counts, sequence steps, fault delays, debounce logic, and machine timing.
A strong automation technician understands:
TON = delay ON
TOF = delay OFF
RTO = retain accumulated time
CTU = count events
ONS = pulse for one scan
RES = reset timer or counter
When troubleshooting, do not only look at whether a bit is ON or OFF.
Look at:
Timer ACC
Timer PRE
Timer DN
Counter ACC
Counter PRE
Counter DN
One-shot trigger condition
Reset logic
Timers control when something happens. Counters track how many times it happens. One-shots make sure it happens only once.
Understanding these instructions will make ladder logic much easier to read and troubleshoot.