1. Electrical Panel Troubleshooting: The Technician Mindset (1 of 13)
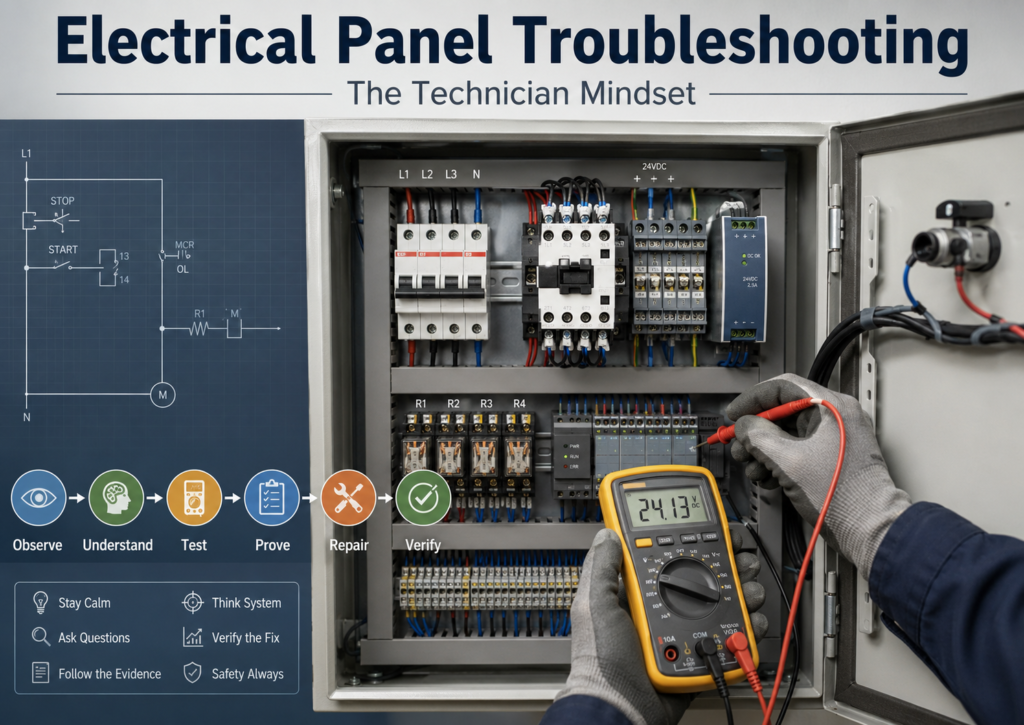
Why Good Troubleshooting Starts Before You Touch a Tool
Troubleshooting an electrical control panel is not just about using a multimeter, replacing parts, or resetting faults. A good technician must first develop the correct mindset.
In industrial maintenance, downtime can be expensive, stressful, and sometimes dangerous. When a machine stops, everyone wants the same thing: get it running again as quickly as possible. But speed without method can lead to mistakes, repeated failures, damaged equipment, and unsafe conditions.
Real troubleshooting is not guessing.
Real troubleshooting is a controlled process of observing symptoms, understanding the circuit, testing with purpose, and identifying both the immediate fault and the root cause.
Competent technician must use a methodical means of troubleshooting and root cause analysis, not random testing or part swapping.
1. Do Not Start by Guessing
One of the biggest mistakes in troubleshooting is starting with assumptions.
For example:
“The motor is not running. It must be the motor.”
Maybe. But maybe not.
The real issue could be:
- No control voltage
- Blown fuse
- Tripped overload
- Open stop circuit
- Bad contactor coil
- Failed auxiliary contact
- Bad PLC output
- Missing output common
- Loose terminal
- Broken wire
- Failed field device
A professional technician does not replace the motor first. A professional technician proves where the circuit is working and where it stops working.
Good troubleshooting asks:
What should be happening?
What is actually happening?
Where does the expected signal or voltage disappear?
That mindset is what separates a troubleshooter from a parts changer.
2. Understand the Symptom First
Before opening the panel, start with the symptom.
Ask the operator or review the work order:
- What stopped working?
- Did it happen during startup, shutdown, or normal operation?
- Is the entire machine down or only one function?
- Did any alarm appear on the HMI?
- Was there a recent change, repair, washdown, jam, or power loss?
- Is the problem constant or intermittent?
The manual explains that a work order normally describes the symptoms noticed by the operator. That information gives the technician the first direction before testing begins.
A symptom is not the final answer. It is the starting point.
For example:
| Symptom | Possible Direction |
|---|---|
| Nothing works | Start with incoming/control power |
| One light does not turn on | Focus on that branch circuit |
| PLC output LED is ON but device is OFF | Check output power, wiring, and field device |
| Motor starter pulls in but motor does not run | Check power circuit |
| Motor overload trips repeatedly | Look for load, current, voltage, or mechanical issues |
3. Know the Normal Operation
Before you can troubleshoot a system, you need to understand how it is supposed to work.
This is extremely important.
A technician should be able to explain the normal sequence:
Start pushbutton is pressed.
Control relay energizes.
Seal-in contact holds the circuit.
Pilot light turns on.
Contactor energizes.
Motor starts.
Overload protects the motor circuit.
Stop pushbutton opens the control circuit.
Motor stops.
If you do not understand normal operation, every measurement becomes confusing.
That is why electrical prints, circuit descriptions, PLC logic, and HMI status screens are so valuable. They tell you what the circuit should be doing before you decide what is wrong.
The manual also emphasizes using the circuit diagram as a guide to determine where voltage should be present, what voltage level should be expected, and when that voltage should be present.
4. Start at the Point of Failure
A strong troubleshooting method is to start at the point where the failure is visible and work backward toward the source.
This is called a backtracking method.
Example:
If a pilot light does not turn on, do not start randomly checking every terminal in the panel.
Start at the pilot light circuit:
Power Source → Fuse → Control Contact → Pilot Light → NeutralThen ask:
- Is voltage present at the pilot light?
- Is neutral present?
- Is the relay/contact closing?
- Is control power available before the contact?
- Is the fuse good?
- Is the source voltage present?
The manual describes this same method: begin testing at the point of failure, then systematically backtrack to reveal the source of the problem.
This approach saves time because every measurement has a purpose.
5. Separate the Circuit into Sections
A control panel can look complicated, but troubleshooting becomes easier when you divide the system into sections.
Most industrial circuits can be separated like this:
Power Source
Protection Devices
Control Devices
Logic / Relay / PLC
Output Device
Field Wiring
Load
Return Path / Neutral / Common
For a PLC-controlled output, the path may look like this:
PLC Logic → Output LED → Output Terminal → Fuse/Common → Field Wire → Solenoid/Relay/Contactor → Common/NeutralThis helps you avoid a common mistake:
Seeing a PLC output LED ON and assuming the field device must be energized.
That is not always true.
The LED only tells you the PLC is commanding the output. It does not always prove that voltage is reaching the device in the field.
6. Use the Multimeter with a Purpose
A multimeter is one of the most important tools for electrical troubleshooting, but it must be used correctly.
Do not just measure random points.
Before placing the meter leads, ask yourself:
What am I expecting to read here?
What does this reading prove?
What will I test next if the reading is good?
What will I test next if the reading is bad?
Example:
If you expect 120 VAC at a relay coil and you measure 0 VAC, that tells you the coil is probably not being commanded or the circuit path is open before the coil.
If you measure 120 VAC at the coil and the relay does not energize, now the relay coil itself becomes suspicious.
A measurement should always move the diagnosis forward.
The manual also gives an important safety reminder: always make sure the multimeter is set to the correct range and function before testing.
7. Do Not Confuse the Immediate Fault with the Root Cause
Finding the failed part is only part of the job.
For example, you may find:
Blown fuseThat is the immediate fault.
But the root cause may be:
Shorted solenoid coil
Damaged cable
Water inside junction box
Wrong fuse size
Loose terminal causing heat
Intermittent short during machine movement
If you only replace the fuse, the machine may run again temporarily. But if the real cause is still present, the failure will return.
The manual repeatedly warns that a quick fix may not completely solve the problem and that the root cause must be identified to prevent recurrence.
A professional troubleshooting mindset always asks:
Why did this component fail?
What caused this condition?
Can this happen again?
What corrective action prevents recurrence?
8. Document What You Find
Good technicians take notes.
This does not need to be complicated. A simple troubleshooting note can include:
Symptom:
Motor conveyor M1 would not start.

Observation:
Start PB input was working. Stop circuit was healthy. PLC output LED energized.

Testing:
Measured 0 VAC at field output terminal.
Measured 120 VAC at output common feed before fuse.
Measured 0 VAC after fuse.

Finding:
Output fuse was open.

Correction:
Replaced fuse after inspecting wiring and load.

Root Cause:
Solenoid cable insulation damaged near moving bracket, causing intermittent short.

Follow-Up:
Cable replaced and rerouted away from mechanical movement.
This type of note is valuable because it shows logic, evidence, and corrective action.
It also helps other technicians if the same issue happens again.
9. The Technician Mindset Formula
A simple troubleshooting formula:
Observe → Understand → Test → Prove → Repair → Verify → Find Root CauseOr, in a more industrial style:
Symptom
Expected Operation
Actual Operation
Point of Failure
Voltage/Signal Verification
Immediate Fault
Root Cause
Corrective Action
Final Test
This is the mindset we will use throughout this series.
10. Final Thoughts
Electrical panel troubleshooting is not about being the fastest person to replace a component. It is about being the technician who can calmly follow the circuit, prove the fault, repair the issue safely, and prevent the problem from coming back.
The best troubleshooters are methodical.
They understand the machine operation.
They read the diagram.
They test with purpose.
They respect safety.
They document findings.
They look for root cause.
That is the foundation of real industrial troubleshooting.
In the next post, we will cover:
Safety First: Before Troubleshooting an Electrical Panel
Because before we troubleshoot any control panel, we need to understand how to work safely around electrical energy, live circuits, stored energy, and Lockout/Tagout procedures.